Payment gated lockbox over LTE with Particle and Stripe
Sep, 06 2024
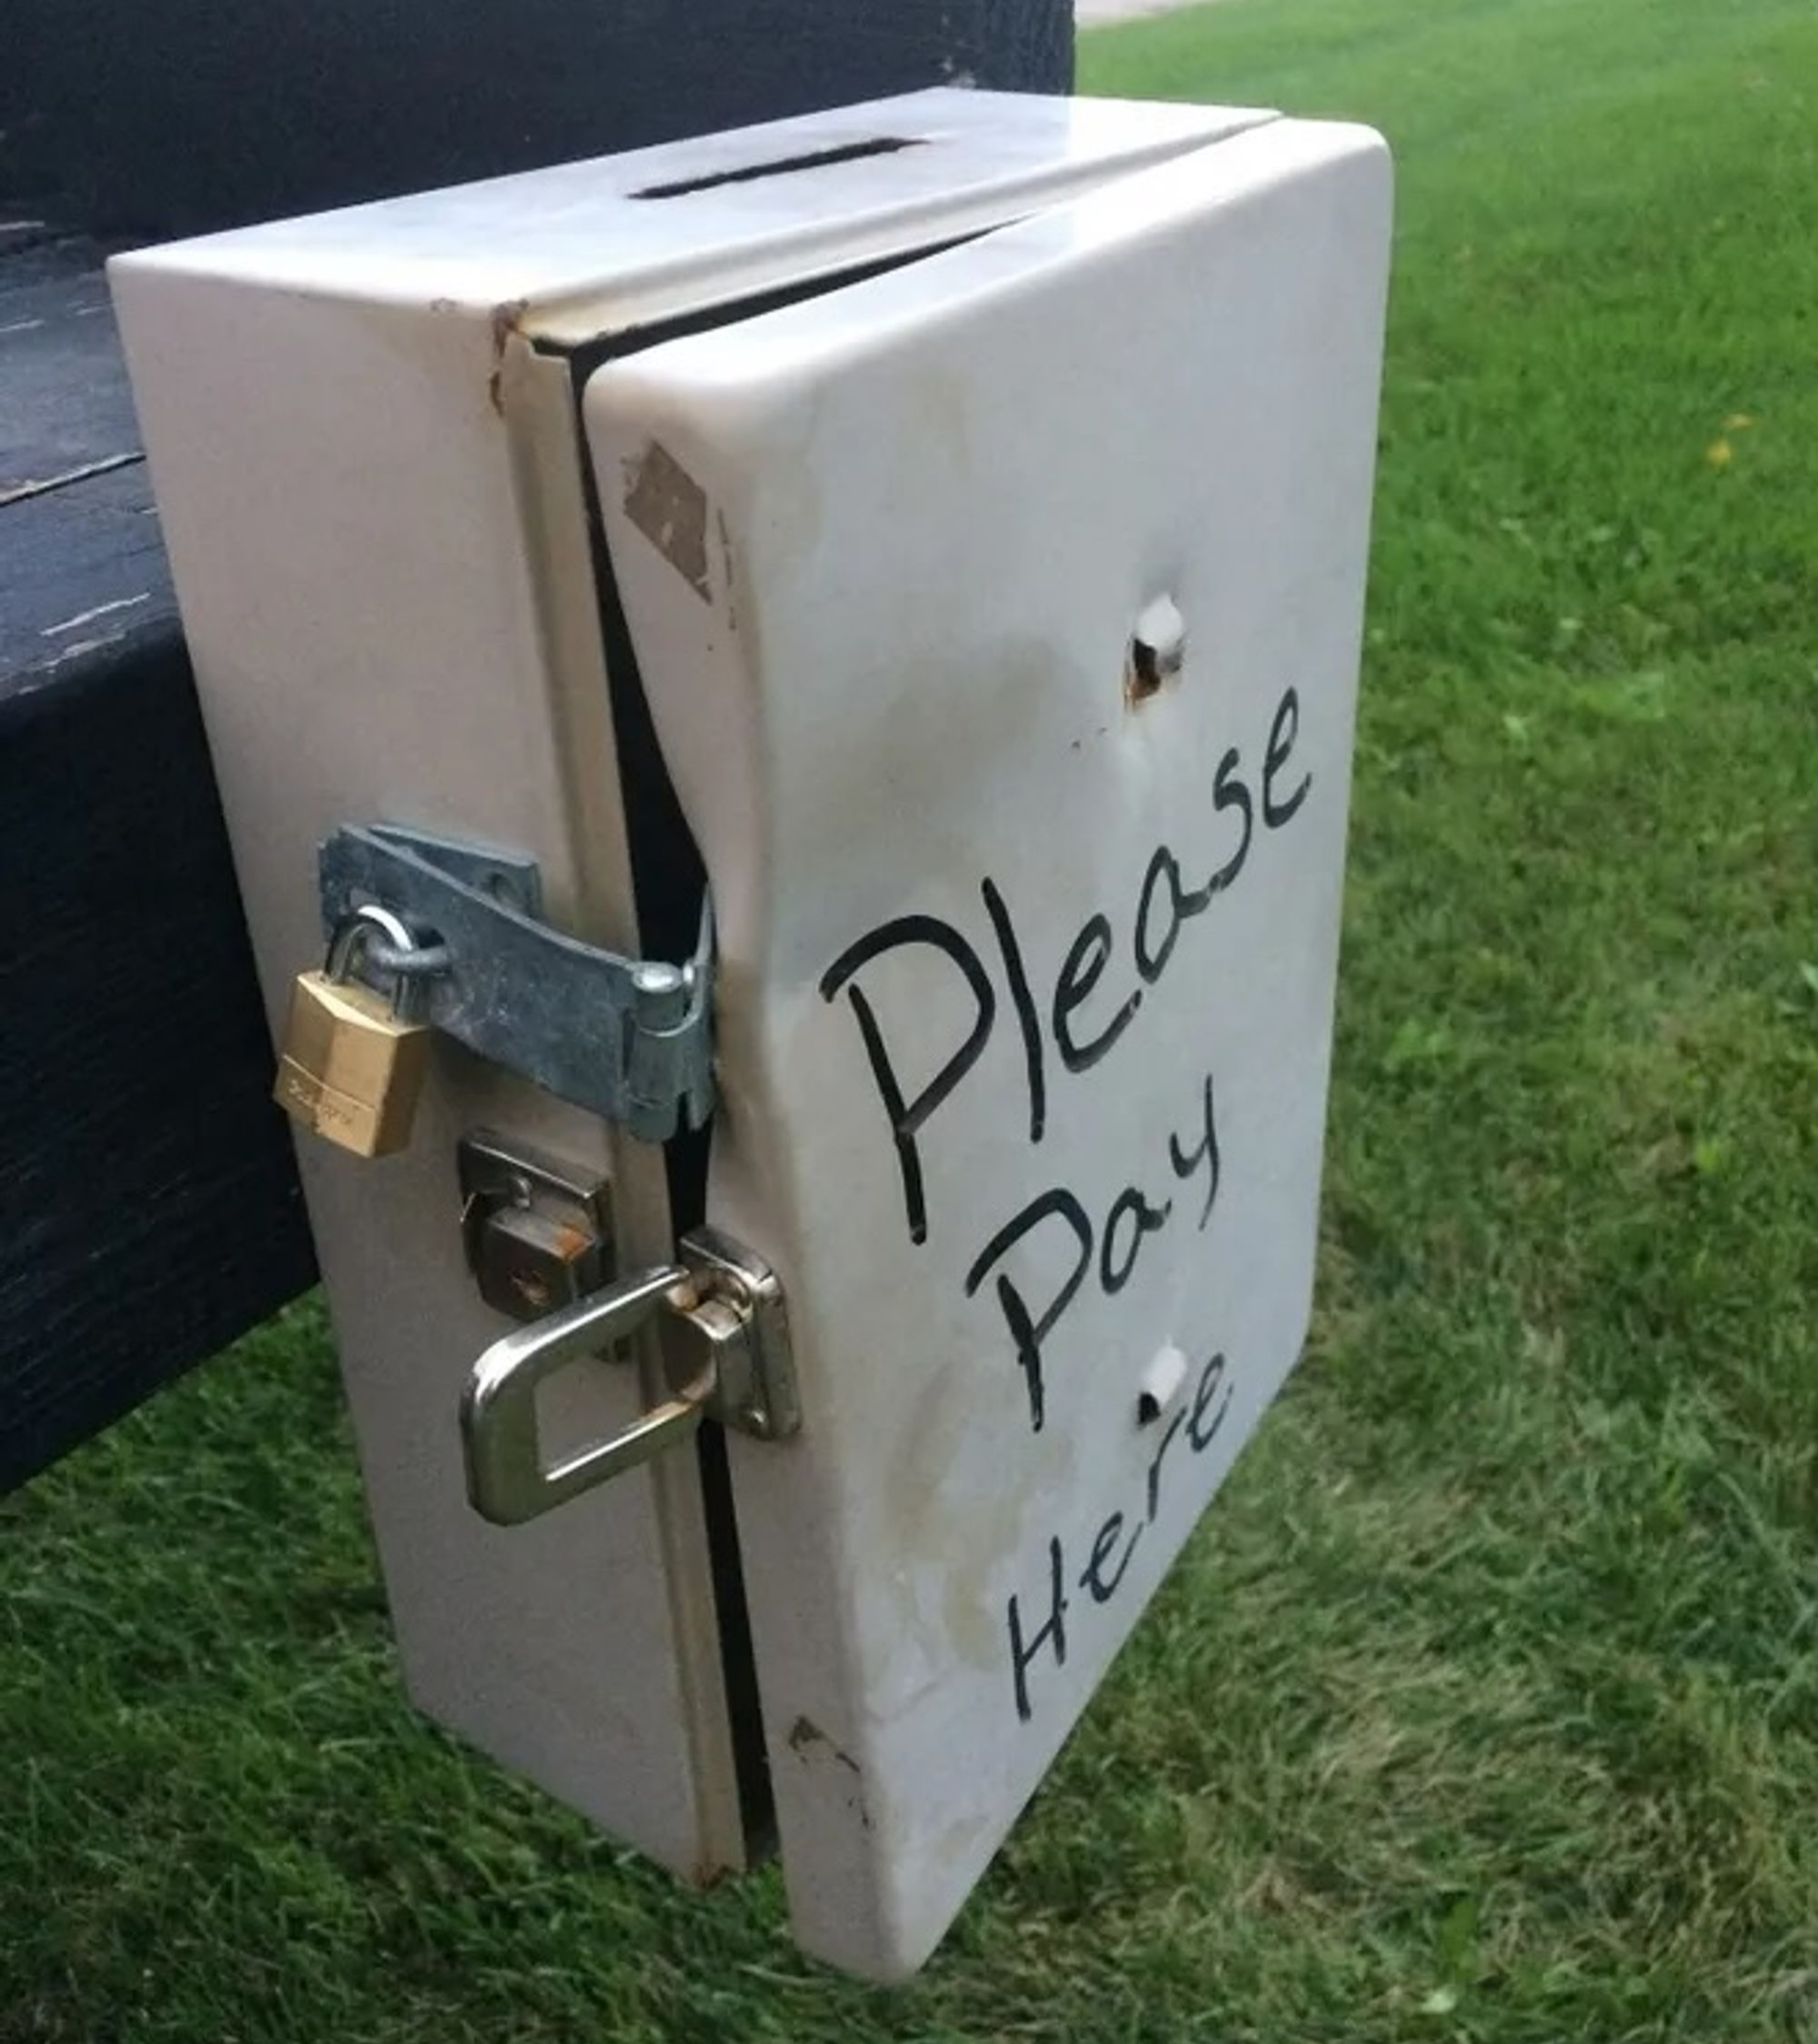
Roadside stands have some faults. They rely purely on the honor system and they might only accept cash. This means the money that’s collected is stored out in the open. Let’s try to bring the idea into the digital era by designing a lockbox that can take a digital payment from a would-be customer.
The box should unlock once the transaction completes. We’ll also connect via LTE as we can’t guarantee there will be WiFi access available. By leveraging the Particle platform with the Boron board we can get up an running with a cellular connection quickly and easily.
Starting with the hardware, we’ll need a couple of components to get this project off the ground:
| Particle Boron | Main LTE enabled microcontroller |
|---|---|
| DC-DC Regulator | Convert 12V into 5V to power the microcontroller |
| MOSFET Driver | High power switch for the lock solenoid |
| Solenoid Lock | Locking solenoid to keep the door closed |
| 12V Power Supply | 12V 2A DC power supply to power everything |
| Barrel Jack | 2.1mm barrel jack connector for the power supply |
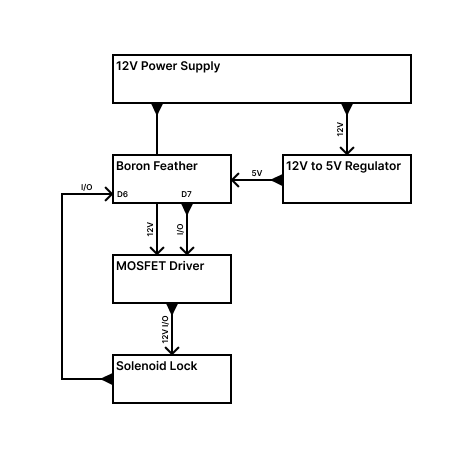
The hardware can be wired as follows:
Start by setting up your Boron device in the Particle Setup page. Once configured, make note of your device ID in your Particle Console’s devices page.
Stripe setup
Next, we need to configure the product in Stripe that we’re trying to sell. Login or signup with Stripe and navigate to your dashboard. It’s a good idea to start in test mode. To do so enable the test toggle on the top of the dashboard.
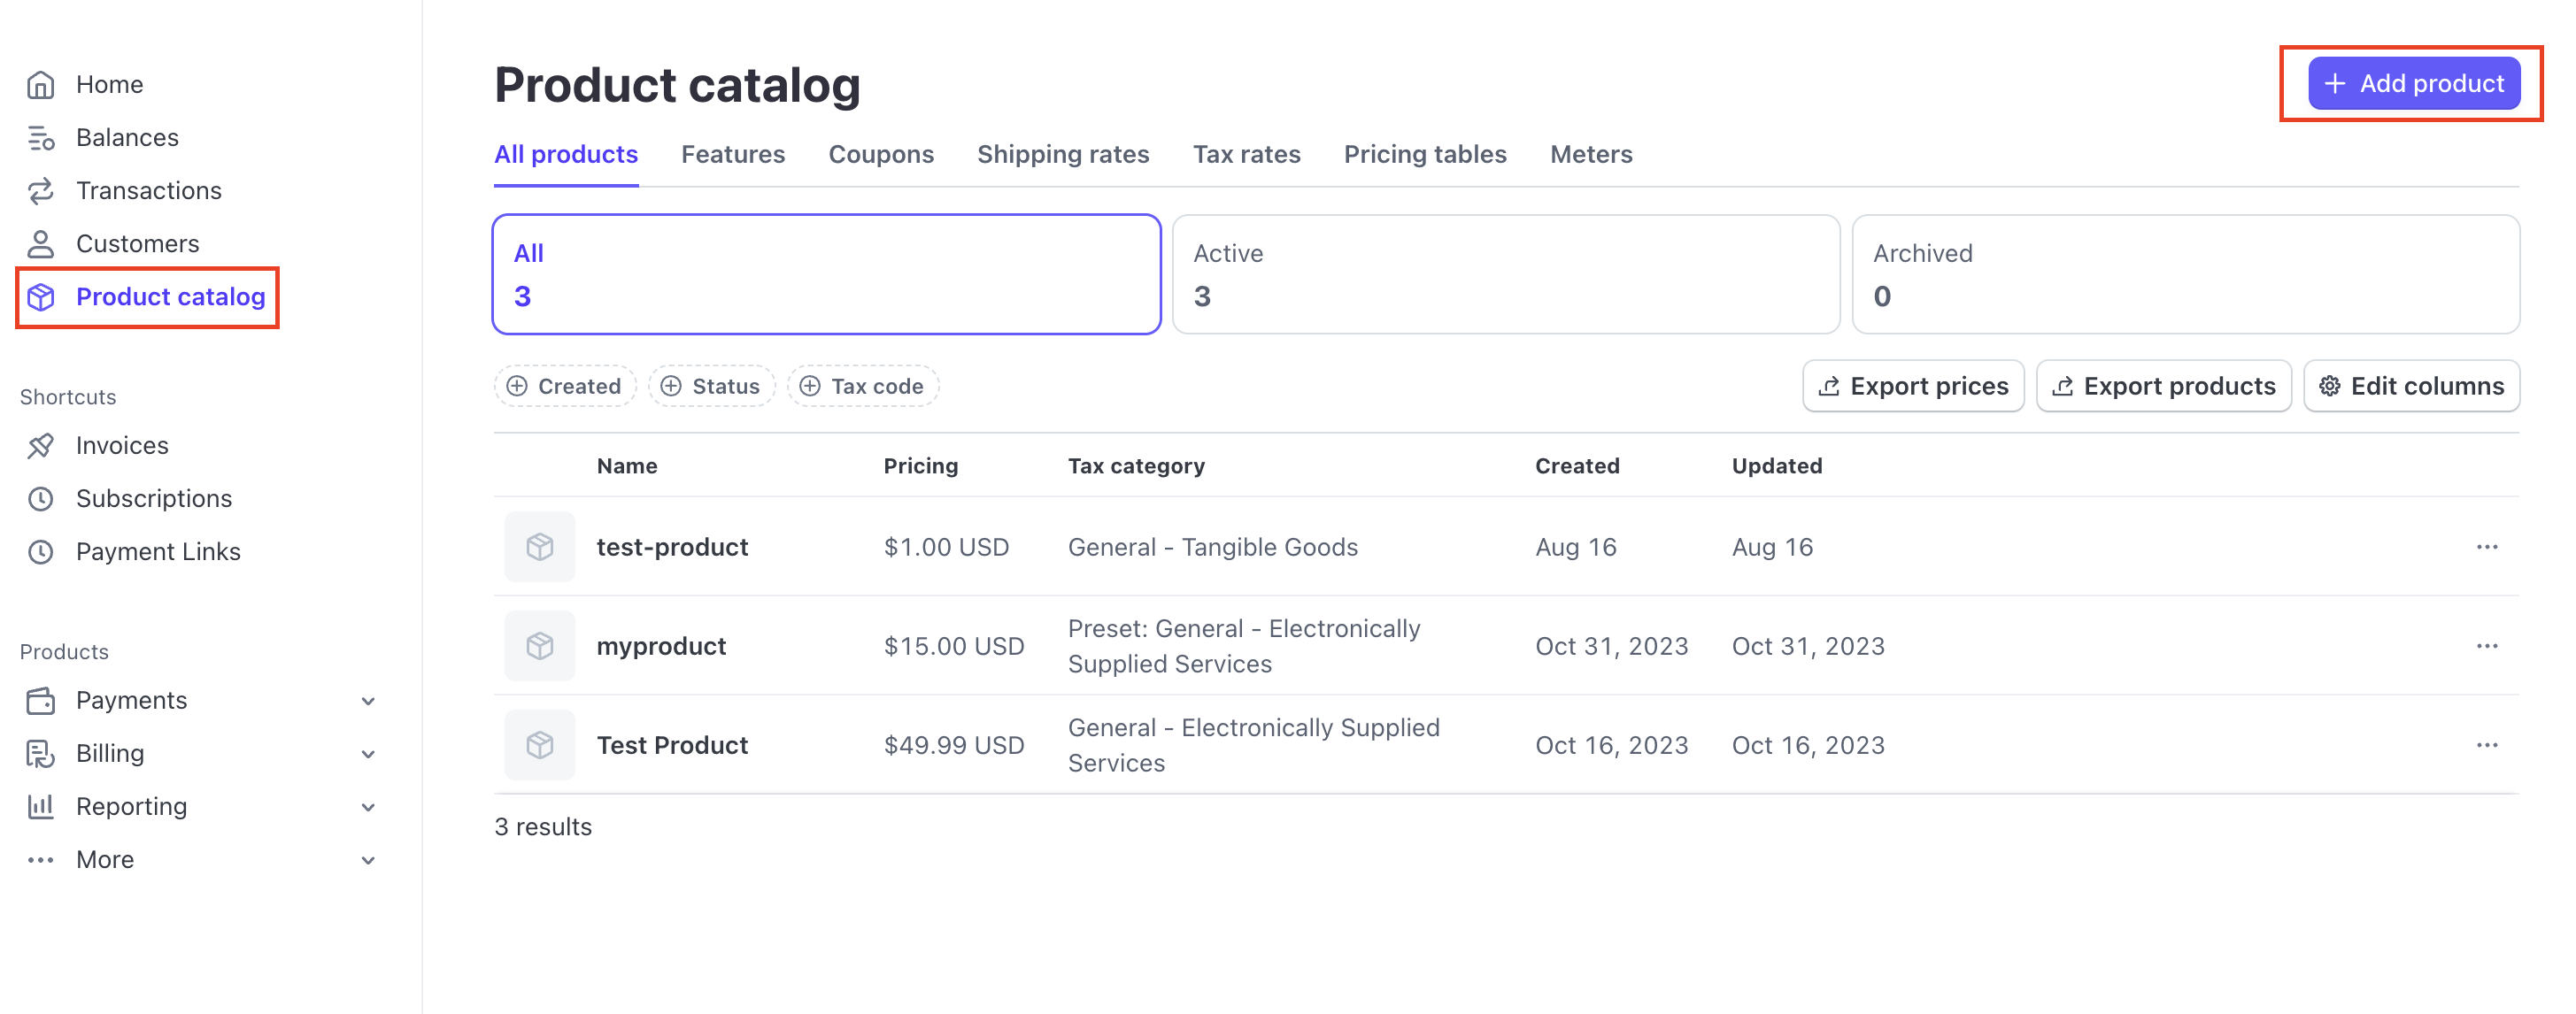
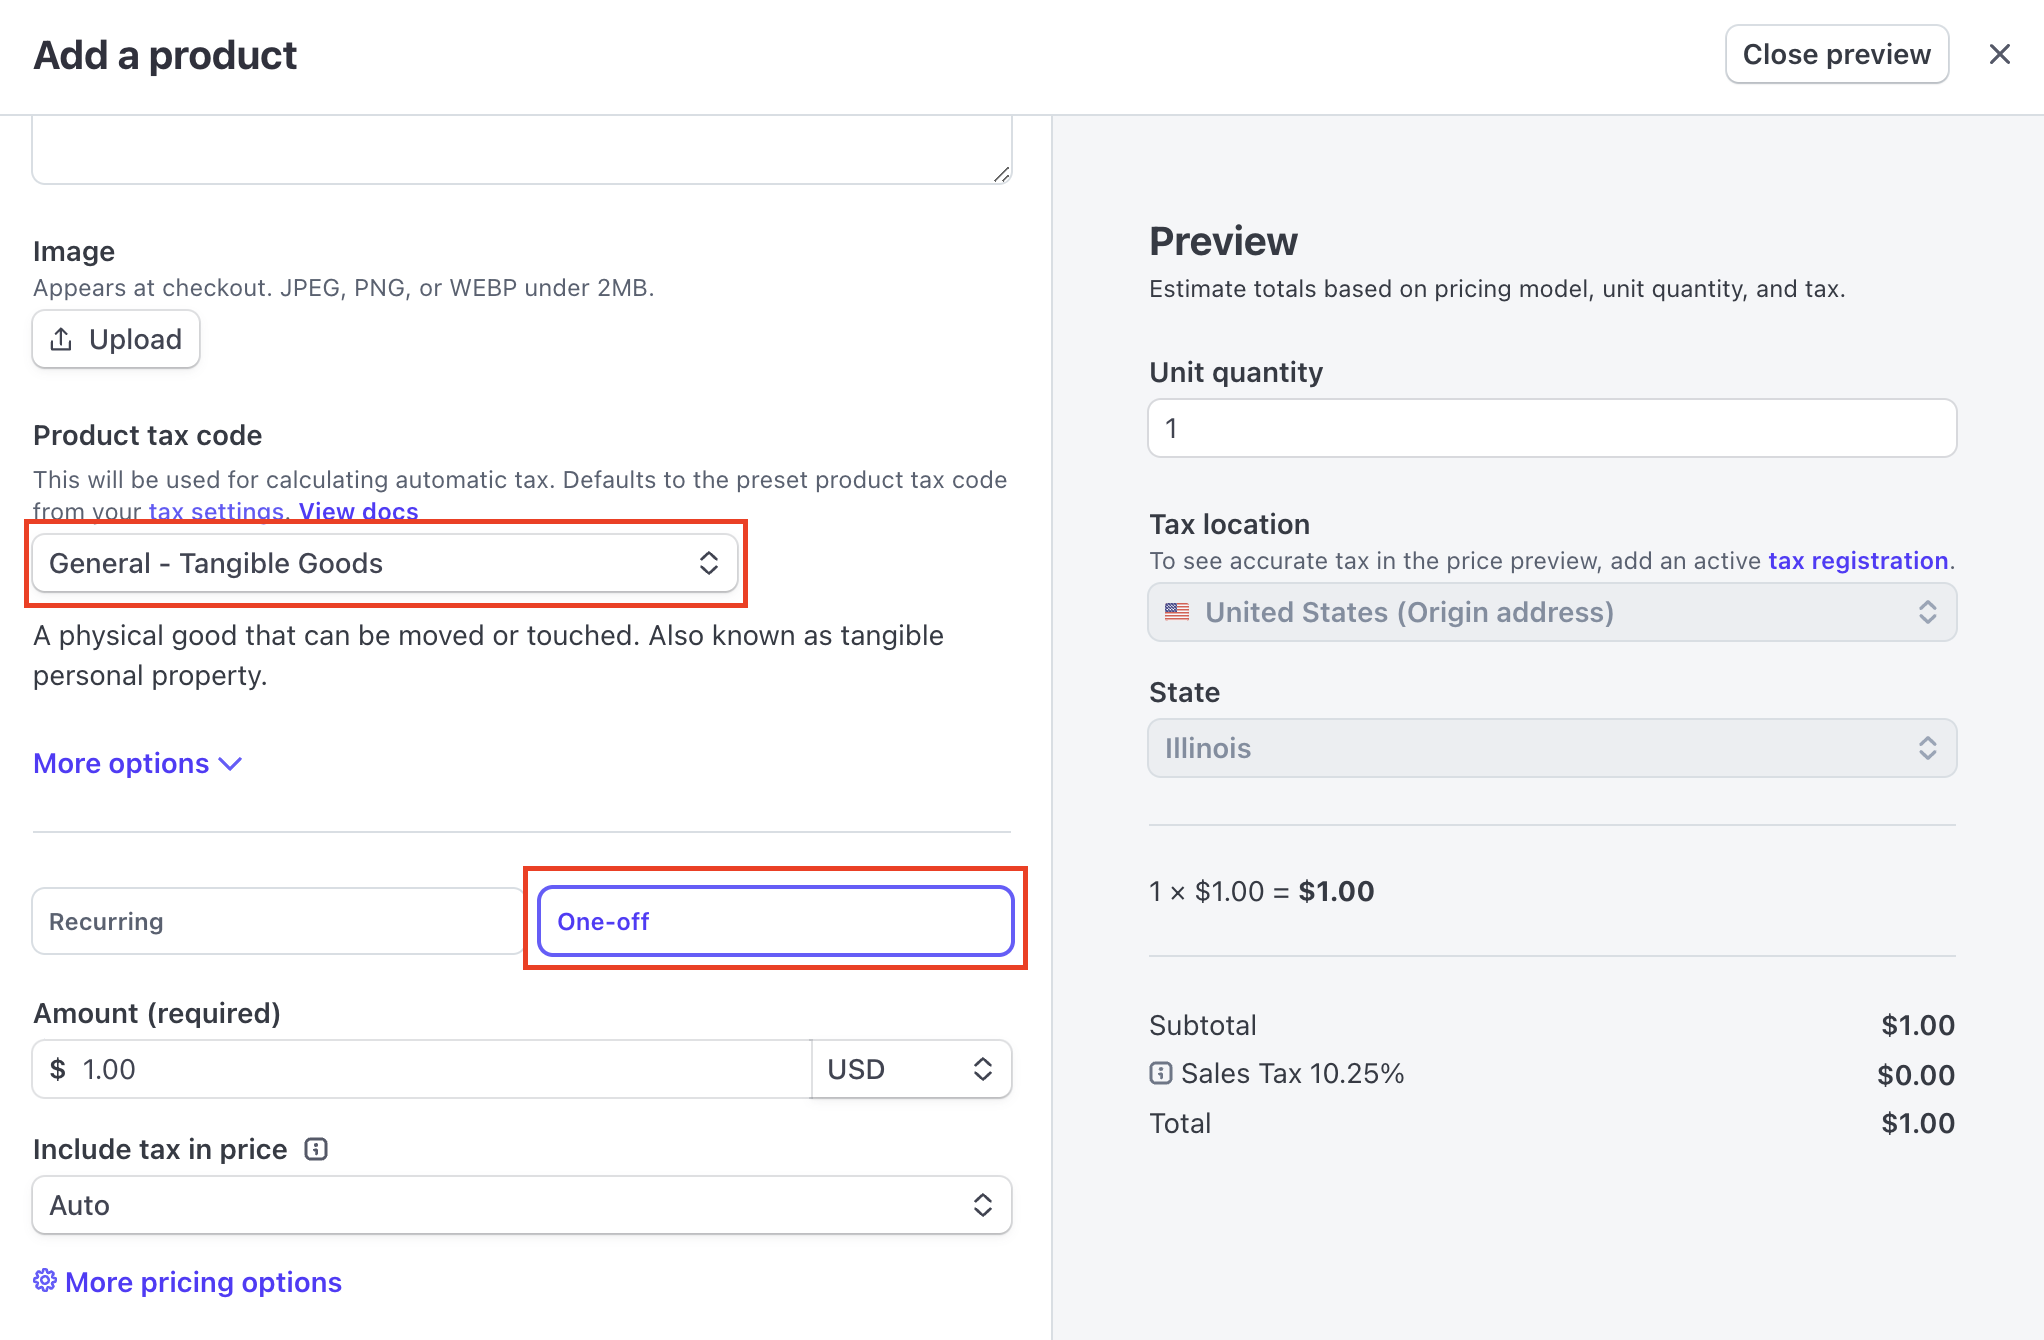
Navigate to “Product catalog” on the sidebar and choose “Add product”.
Name and describe your product. Make sure to update your tax code to “tangible goods” and choose “One-off” for the payment type.
Next, in the sidebar of your dashboard expand “Payments” and choose “Payment Links”. Create a new payment link.
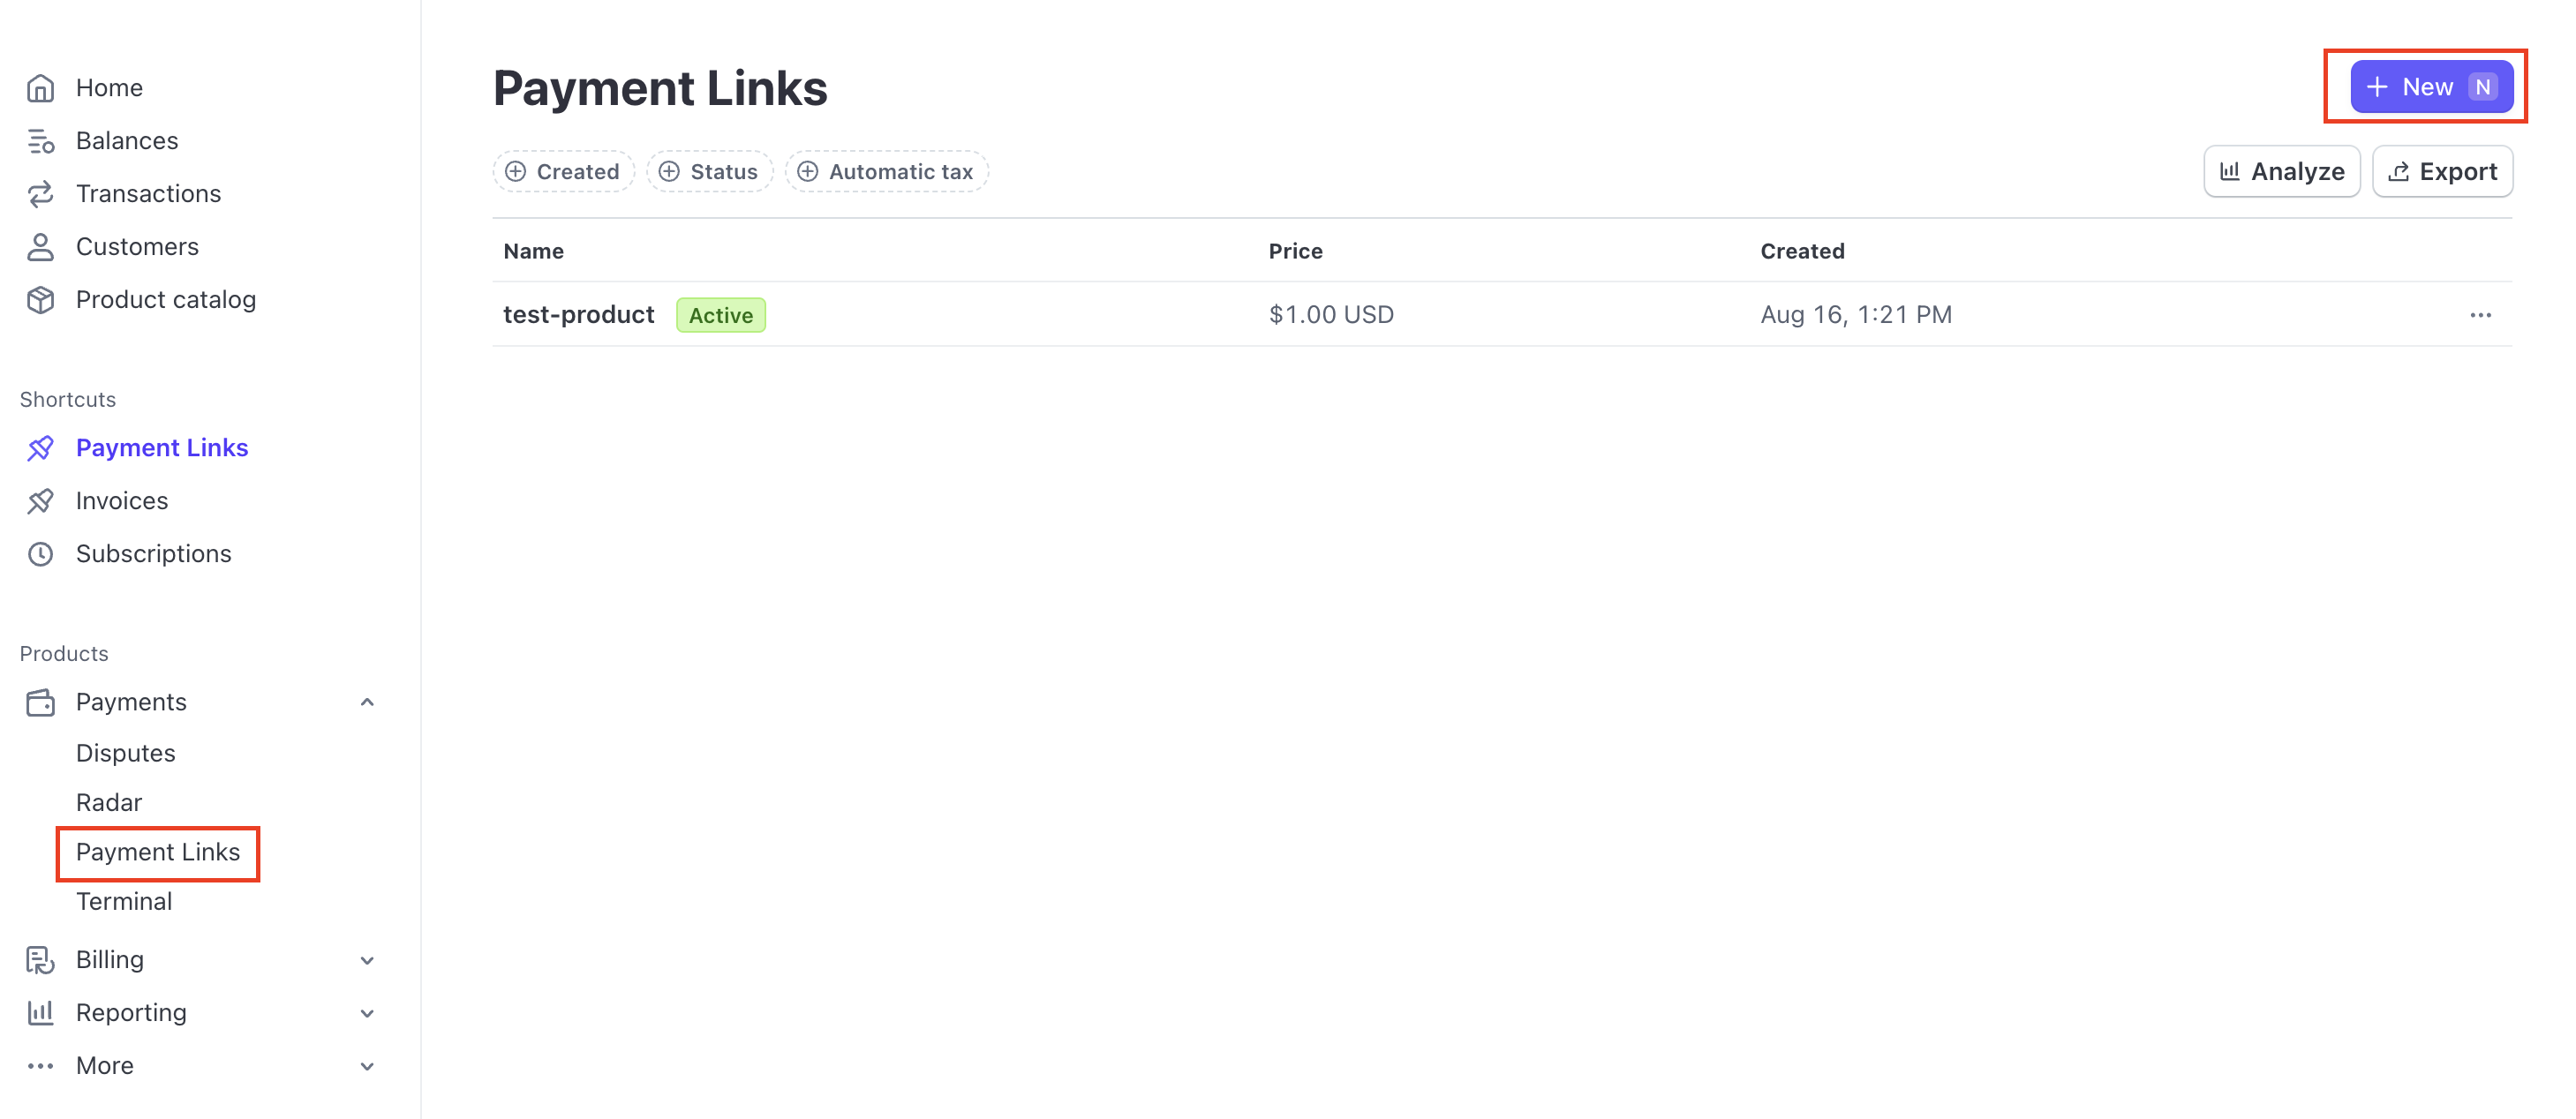
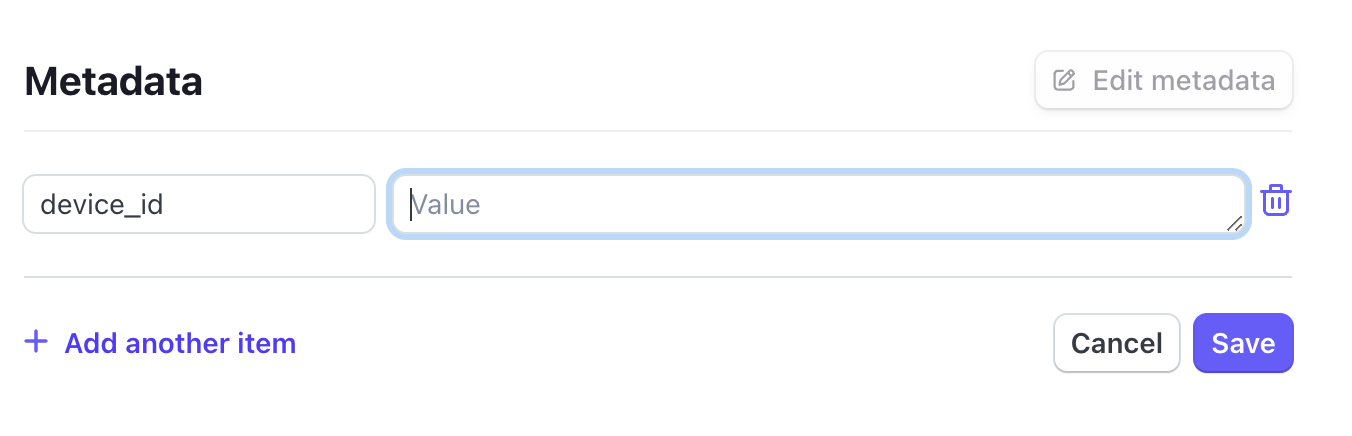
Find the product you just created and choose “Create link”. Once back in the “Payment Links” page click your newly created payment link. Scroll down to the “Metadata” section and click “Edit metadata”. Add a new entry with a key of device_id and the device ID for your Boron device as the value. You can find the device ID in your Particle Console's devices page.
Webhook handler
We’ll need to write some Javascript in order to handle a payment event from Stripe. I’ll be using the Serverless Framework with an AWS Lambda for this section. You will need to have Node.js installed on your computer.
Install Serverless globally:
npm i serverless -g
Create a new project:
serverless
Choose the AWS / Node.js / HTTP API starter template and change directories into your new project. Then run:
npm init -y
npm install stripe
npm install axios
Now open your new project’s parent folder in a code editor of your choice.
We’ll be using the import syntax with the project so navigate to package.json and add the following entry anywhere in the root object.
"type": "module"
In serverless.yml replace the hello function with the following configuration. This defines a POST endpoint at /stripe-webhook and uses the function in webhooks/stripe/index.handler to execute the function. Feel free to update these values as necessary.
functions:
  stripeWebhook:
    handler: webhooks/stripe/index.handler
    description: Stripe webhook callback function
    events:
      - http:
          path: /stripe-webhook
          method: post
          cors: true
We’ll need to update the provider section in serverless.yml to include a few environment variables. This will parse a .env.json file for the listed keys. We’ll add that file later.
provider:
  name: aws
  runtime: nodejs20.x
  environment:
    STRIPE_WEBHOOK_SECRET: ${file(.env.json):STRIPE_WEBHOOK_SECRET}
    STRIPE_SECRET_KEY: ${file(.env.json):STRIPE_SECRET_KEY}
    PARTICLE_API_KEY: ${file(.env.json):PARTICLE_API_KEY}
Create an index.js file at webhooks/stripe (or whatever path you specified in your serverless.yml file). Paste the following code into the index.js file that you just created. This will listen for incoming POST request, validate that the request is coming from Stripe, parse out the device_id from the request’s metadata, and send a request to your device with the sendRequest function. We’ll create the sendRequest function in the next step.
import Stripe from 'stripe'
import { sendRequest } from '../../utils/particle.mjs'

export const handler = async (event) => {
  if (event.httpMethod !== 'POST') {
    throw new Error(`O accept POST method, you tried: ${event.httpMethod}`)
  }

  try {
    const stripeSecretKey = process.env.STRIPE_SECRET_KEY
    if (!stripeSecretKey) {
      throw new Error('No secret key provided')
    }
    const stripe = new Stripe()
    const webhookSecret = process.env.STRIPE_WEBHOOK_SECRET
    if (!webhookSecret) {
      throw new Error('No webhook secret provided')
    }

    const sig = event?.headers['Stripe-Signature']
    const stripeEvent = stripe.webhooks.constructEvent(event.body, sig, webhookSecret)
    const eventType = stripeEvent?.type ?? ''
    let deviceId
    switch (eventType) {
      case 'checkout.session.completed':
        deviceId = stripeEvent.data.object.metadata.device_id
        if (!deviceId) {
          throw new Error('Missing Thing ID metadata!')
        }
        sendRequest(deviceId, 'UNLOCK')
        console.log('checkout session completed!', stripeEvent.data.object.customer_details)
        break
      default:
        console.log(`Unhandled event type ${eventType}`)
    }

    return {
      statusCode: 200,
      body: JSON.stringify(event)
    }
  } catch (e) {
    console.log(e)
    return {
      statusCode: 500,
      body: e.message
    }
  }
}
Now let’s fill in the sendRequest function. Create a new utils folder at the root of your project and add a particle.mjs file. Add the following code to particle.mjs. This will call Particle’s API using your device ID and your Particle API key. We’ll generate the Particle API key in a later step.
import axios from 'axios'

export const sendRequest = async (deviceId, arg) => {
  const url = `https://api.particle.io/v1/devices/${deviceId}/lockFn`
  const token = process.env.PARTICLE_API_KEY
  const config = {
    headers: {
      Authorization: `Bearer ${token}`,
      'Content-Type': 'application/x-www-form-urlencoded'
    }
  }

  const response = await axios.post(url, `arg=${arg}`, config)
  console.log(response.data)
}
Environment variables
Now we can deploy the project by running the following command. The environment variables and API keys are still empty at this stage, so we don’t expect it to work. We simply want to get the auto-generated URL for our new endpoint.
serverless deploy
Once the deployment succeeds, you should see some output in the terminal with a URL. Take note of this URL.
You can also validate the deployment has completed by navigating to AWS Lambda in your AWS Console and searching for a new function named stripeWebhook (or whatever you named it in your serverless.yml file)
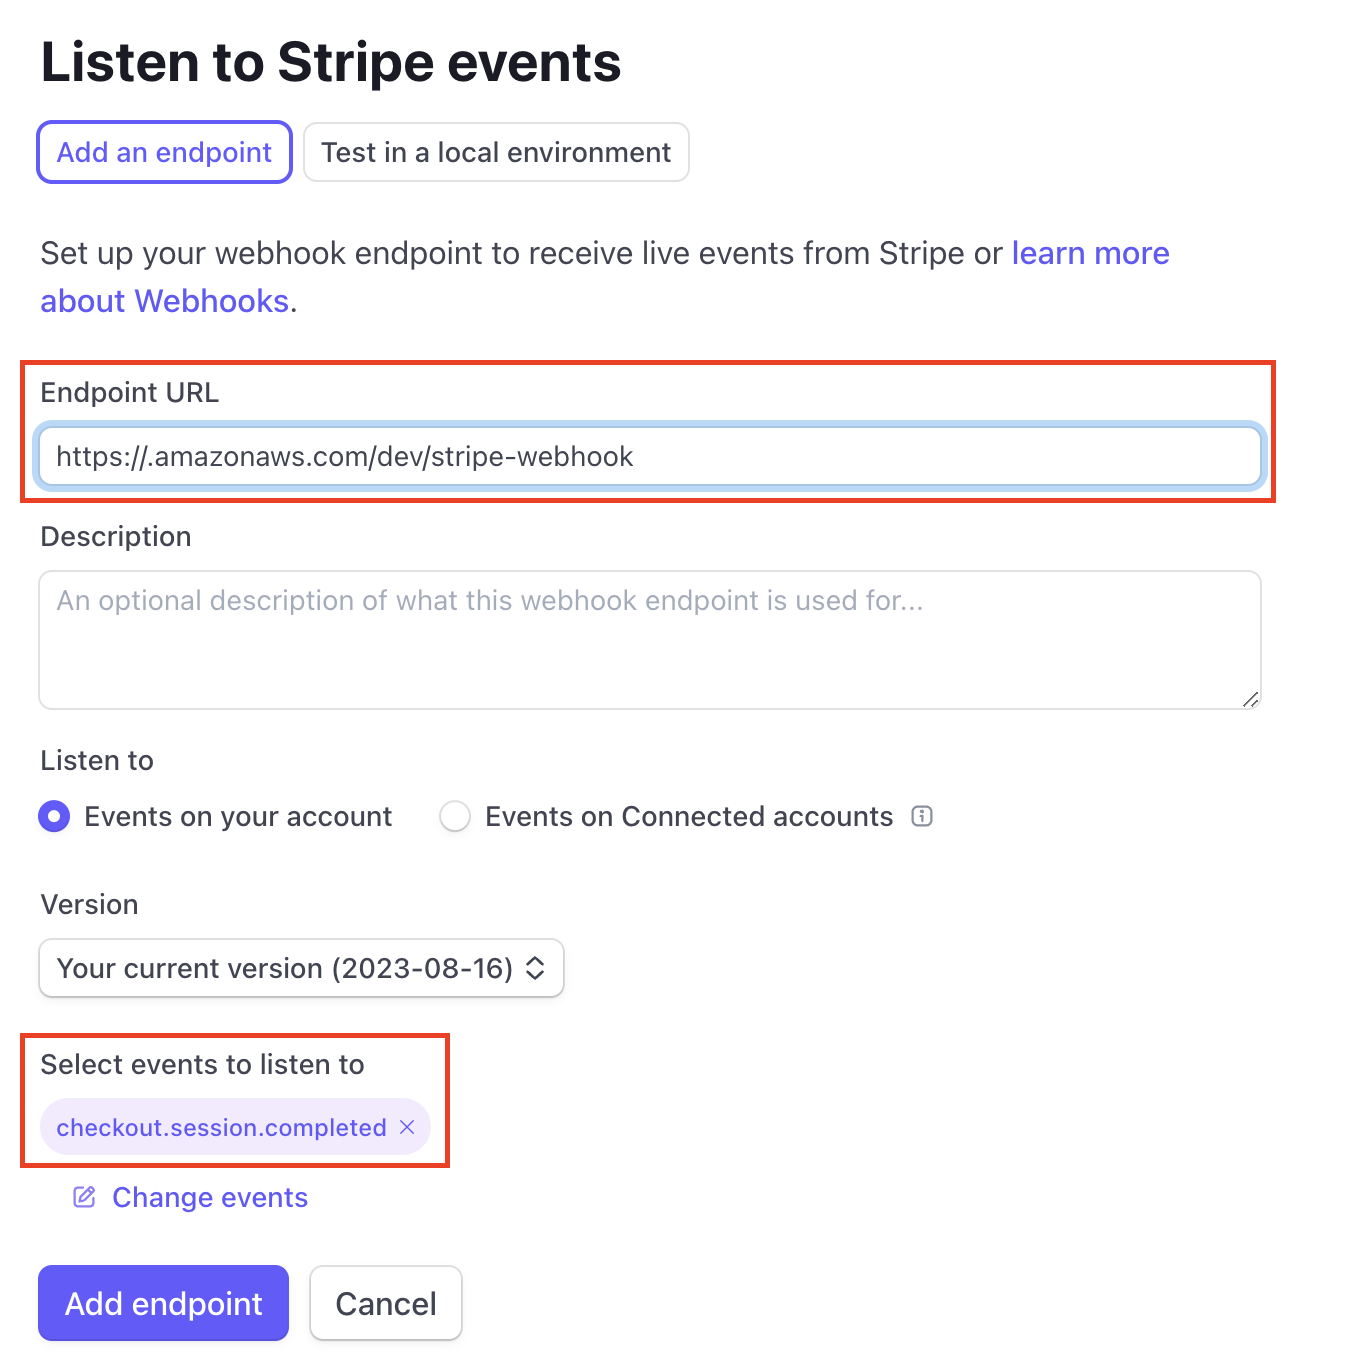
Now navigate back to your Stripe dashboard. In the search bar of the dashboard, search for “Webhooks”. Choose “Add endpoint”.
Paste in the URL for your newly created Lambda function in the “Endpoint URL” field. Under “selected events to listen to” search for checkout.session.completed and select it. Click “Add endpoint” to save these settings.
On the next page there will be a section labeled “signing secret”. Make note of this.

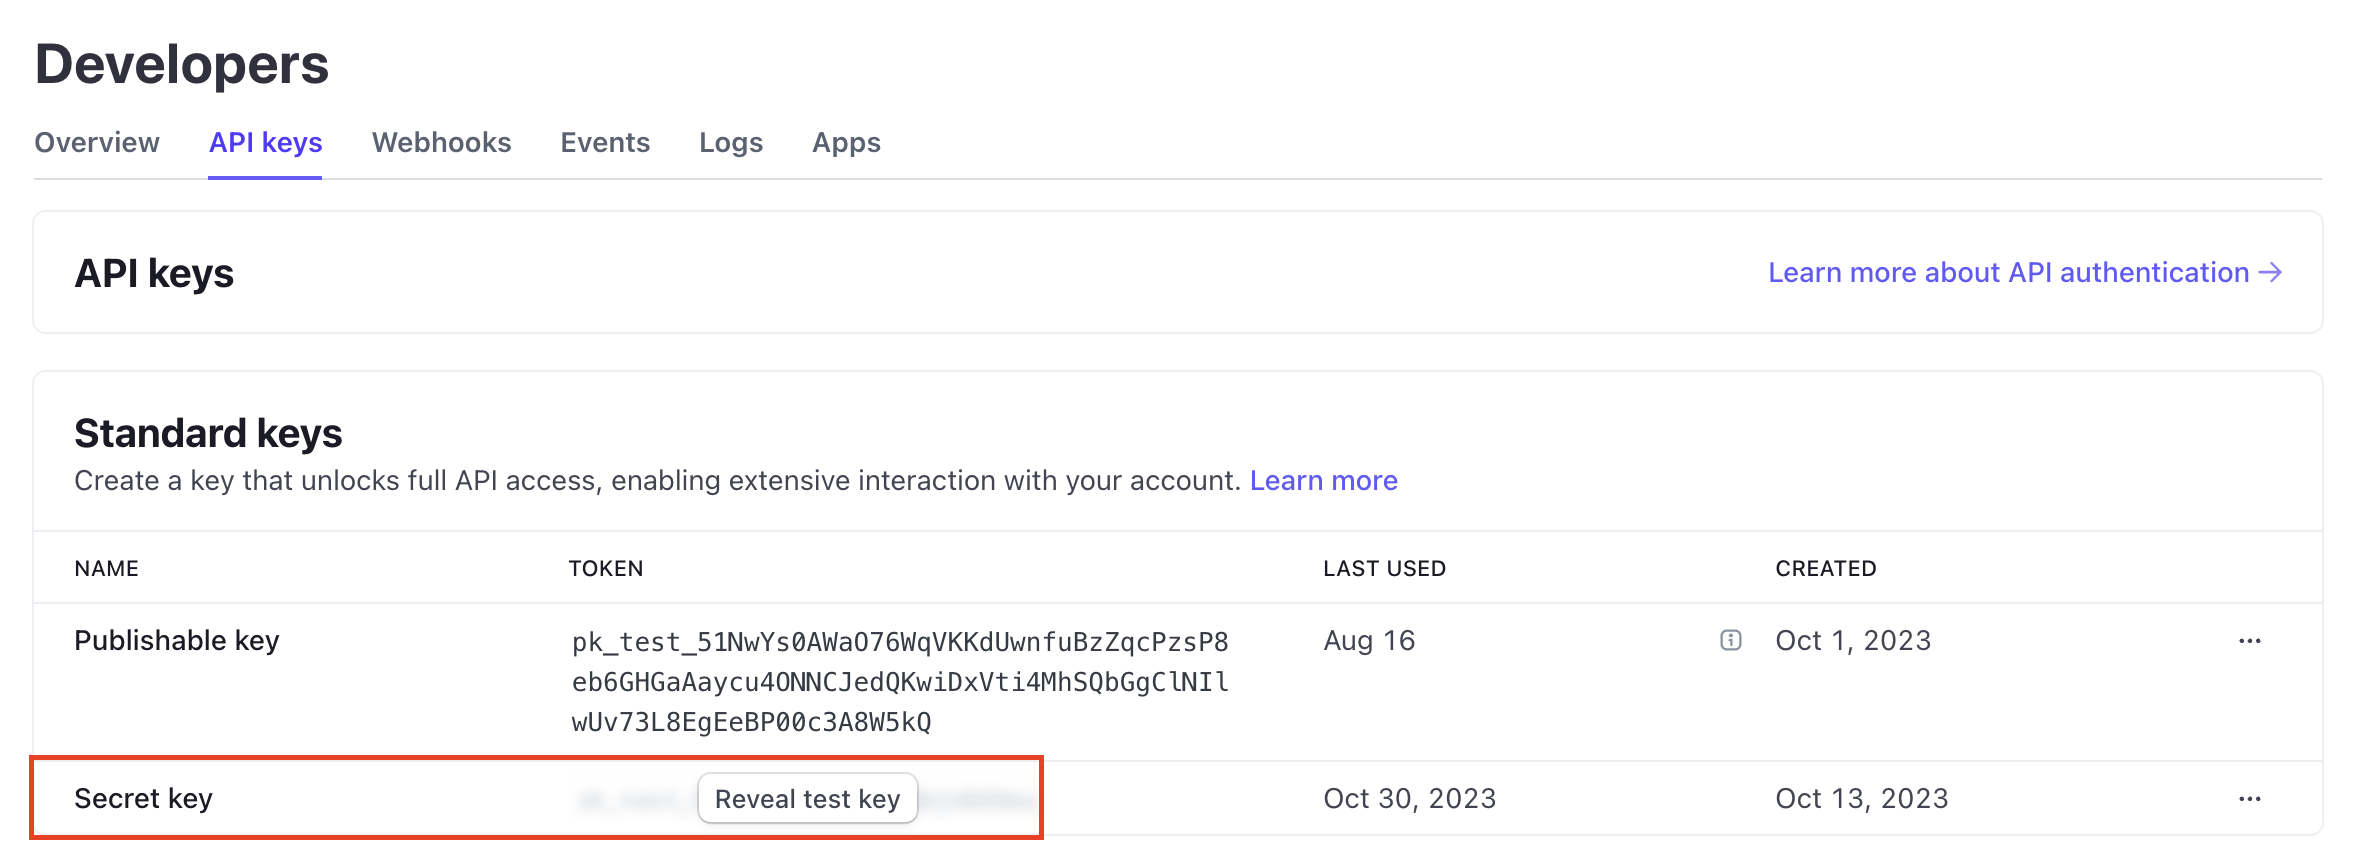
We also need the Stripe account’s secret key. In the Stripe dashboard, search for “Developers” and navigate to the “API keys” section. Under “Secret key”, choose “reveal key” and make note of it.
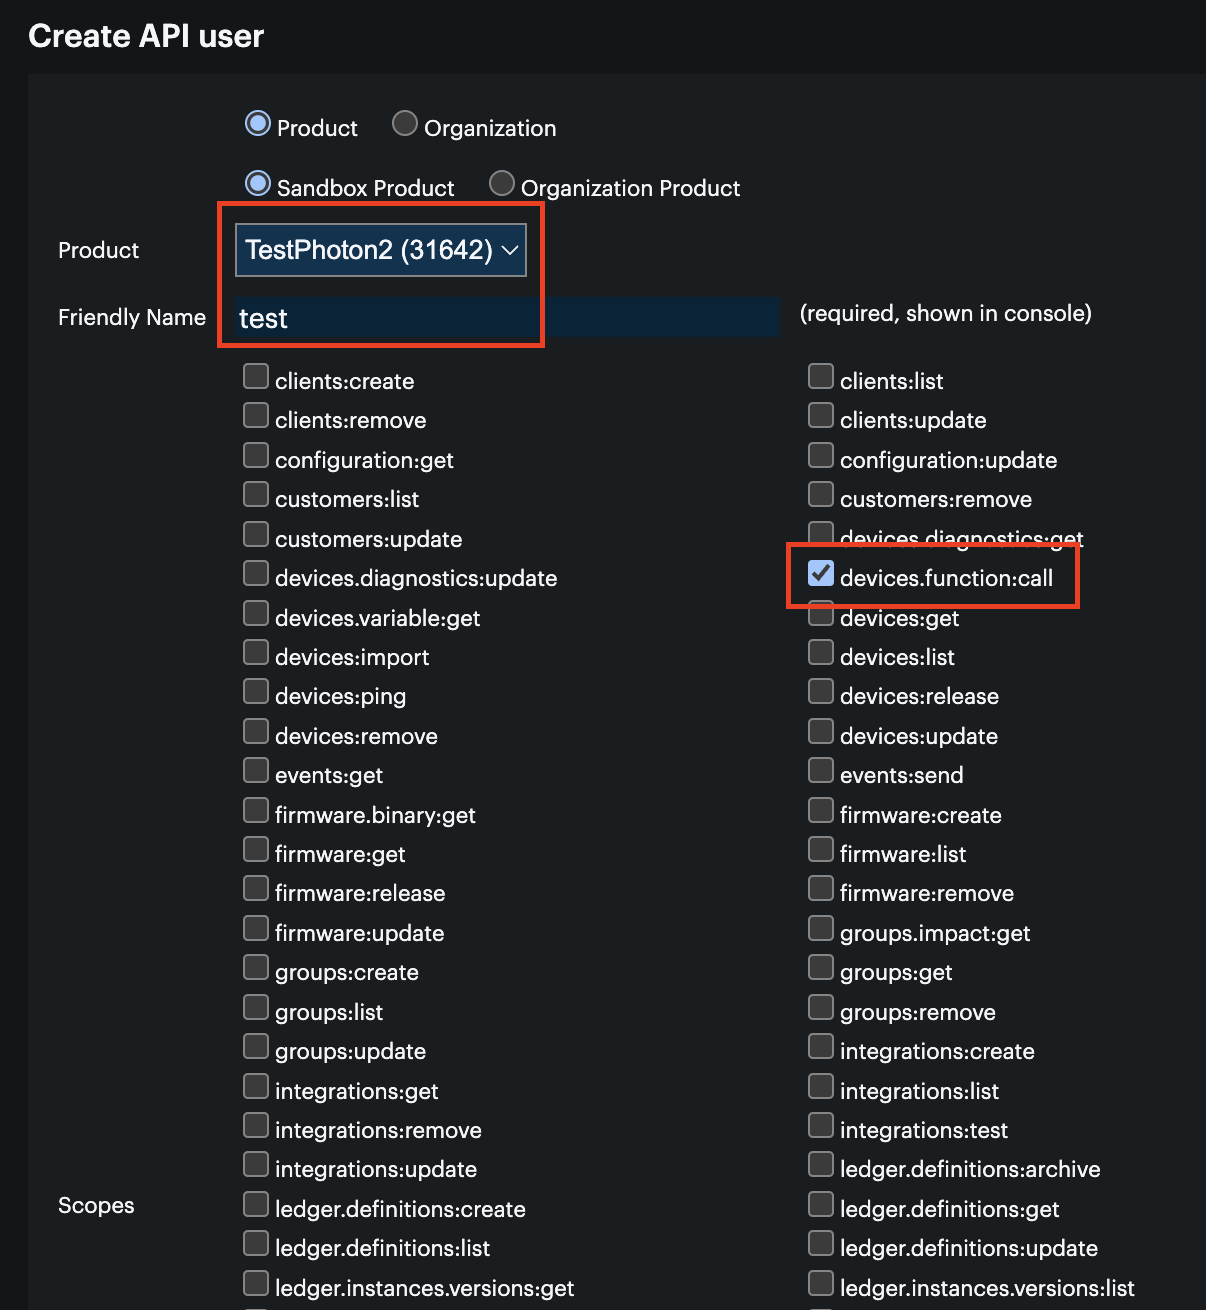
We need one more key for access to the Particle API. Navigate to the Cloud API > Access tokens section of the Particle docs and scroll down to “Getting an API user token”.
There is a tool that allows you to generate an API token with specific permissions. Choose your Boron, give your API user a name, and select the devices.function:call scope. Then select “Create API User” near the bottom of the tool. Make note of the newly create API key.
Now we can put all of the keys into place. Back in the root of your Serverless project, sreate a file named .env.json and fill in your API keys.
Make sure to avoid checking this file into source control!
{
    "STRIPE_WEBHOOK_SECRET": "",
    "STRIPE_SECRET_KEY": "",
    "PARTICLE_API_KEY": ""
}
Now deploy again so our changes could take effect.
serverless deploy
Navigate to the Lambda dashboard in your AWS Console. Select your Stripe webhook Lambda, scroll down, and select the “configuration” tab. Click “environment variables” on the sidebar and make sure everything look matches the values from your local environment.
Finally we can program our Boron to listen for an “UNLOCK” event from our Lambda function. Create a new Particle Workbench project and configure it for your Boron device. You can reference the getting started guide here.
Paste the following code. The code will toggle the D7 pin (which is connected to the MOSFET trigger) when an “UNLOCKED” command is received from your web server. The code will also be aware of the current state of the lock by reading the D6 pin.
#include "Particle.h"

#define LOCK_CTRL_PIN D7
#define LOCK_STATE_PIN D6

SYSTEM_MODE(AUTOMATIC);
SYSTEM_THREAD(ENABLED);

SerialLogHandler logHandler(LOG_LEVEL_INFO);

enum LockState
{
  UNKNOWN,
  UNLOCKED,
  LOCKED
};

LockState lastLockState = UNKNOWN;

int lockFnCallback(String lockState)
{
  Log.info(lockState);
  if (lockState == "UNLOCK")
  {
    digitalWrite(LOCK_CTRL_PIN, 1);
    delay(500);
    digitalWrite(LOCK_CTRL_PIN, 0);
  }
  return 0;
}

LockState readLockState()
{
  return digitalRead(LOCK_STATE_PIN) == 1 ? UNLOCKED : LOCKED;
}

void setup()
{
  bool success = Particle.function("lockFn", lockFnCallback);
  if (!success)
  {
    Log.info("Failed to initialize function");
  }
  pinMode(LOCK_CTRL_PIN, OUTPUT);
  pinMode(LOCK_STATE_PIN, INPUT_PULLUP);
  lastLockState = readLockState();
}

void loop()
{
  LockState currentLockState = readLockState();
  if (currentLockState != lastLockState)
  {
    Log.info(currentLockState == UNLOCKED ? "Door unlocked" : "Door locked");
    lastLockState = currentLockState;
  }
}
Now that everything is connected together, let’s test it out!
Testing it out
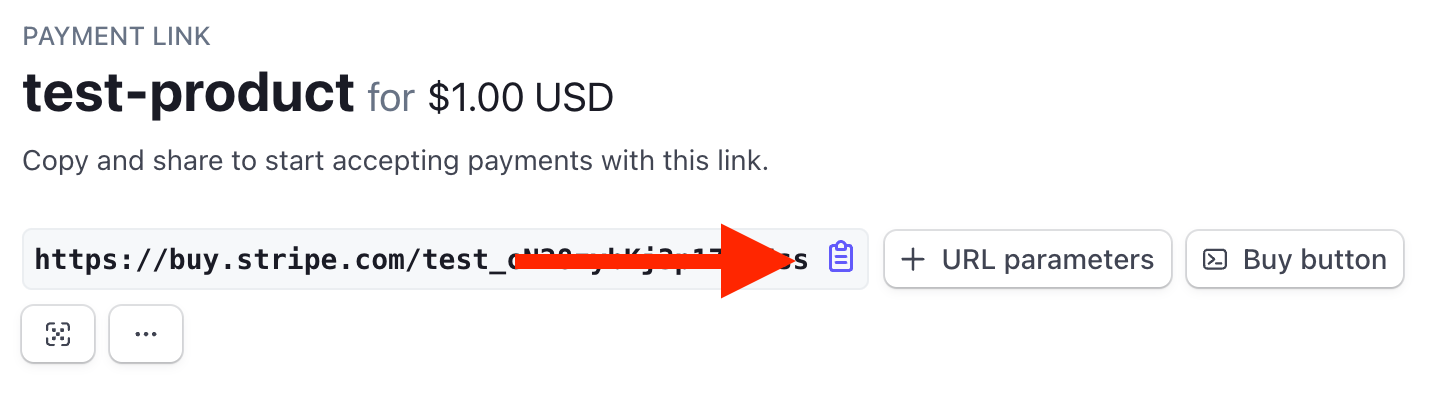
Go back to your Stripe dashboard and navigate to “Payment Links”. Select the payment link that you just created and copy the URL at the top of the link detail page.
Open this link in your browser and fill out your credit card information. If you are in the test mode you can use the credit card number: 4242 4242 4242 4242 as a placeholder.
Once you click “Pay”, you webhook will get called which should end up actuating the lock!
Debugging
You can start looking for issues in the Developers > Webhooks section of the Stripe dashboard. Select the webhook that is associated with your Lambda function and confirm that the request was successful in the logs.
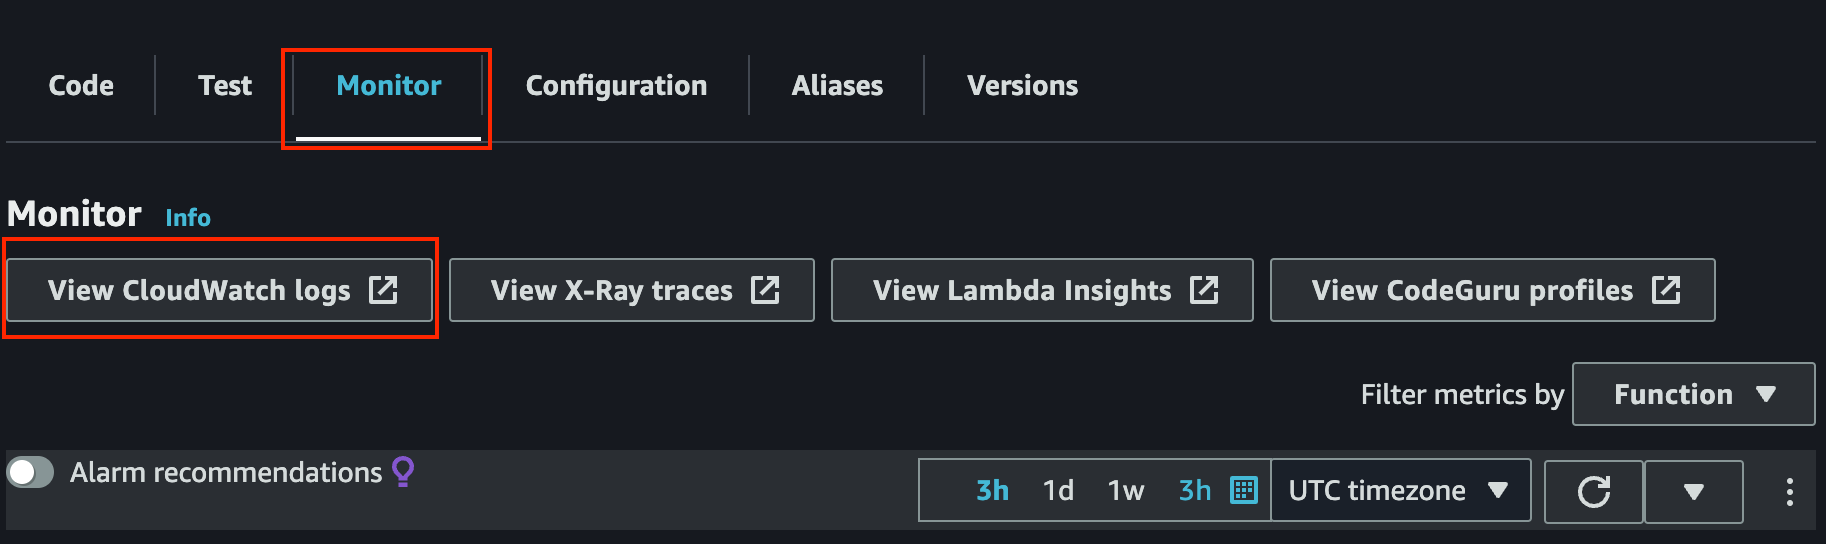
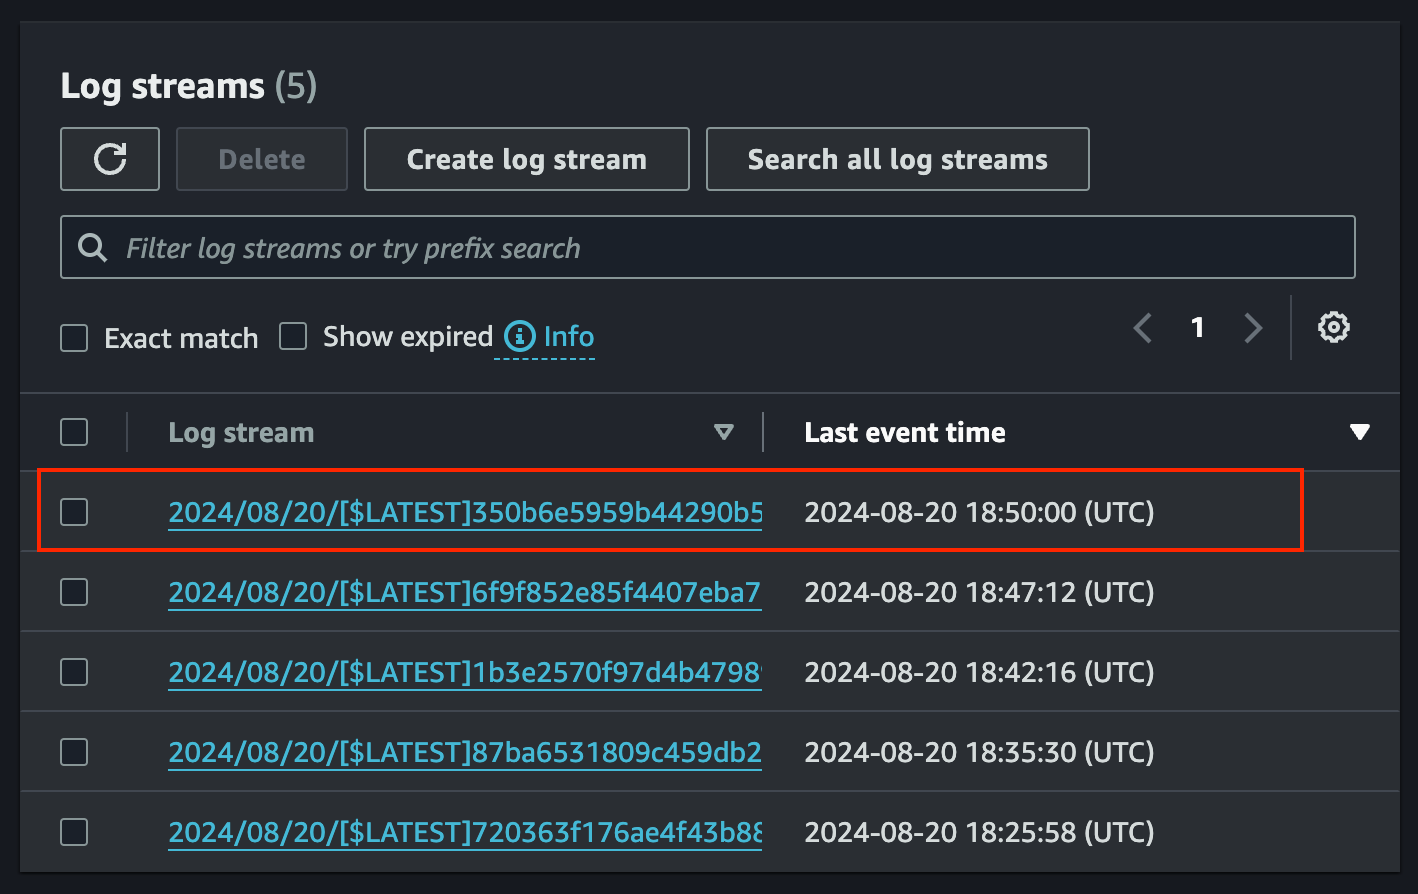
You can also check the logs from your Lambda function if Stripe is reporting a failure. In your AWS Console, navigate to the Lambda dashboard and select the Stripe webhook function. Scroll down and select the “Monitor” tab. Click “View CloudWatch logs”.
In the “Log streams” section select the most recent log stream. Here you can view the console output from your Lambda function. This is very helpful when debugging an issue with your webhook.
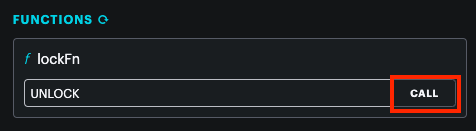
You can check if your device’s lockFn cloud function is working properly in the Particle Console. In the console’s sidebar select “Devices” and click on your Boron’s device ID. Then scroll down to the “functions” section. Submit the “UNLOCK” argument to trigger the cloud function and confirm that your lock actuates.