How to Use Protocol Buffers with Zephyr and Bluetooth Low Energy
The protocol buffer is a lightweight serialization mechanism. They become very useful when developing moderately complex Bluetooth Low Energy applications. You will end up with a self documenting Bluetooth protocol with structured data types.
I recommend trying out protobufs the next time you find yourself typing a code comment such as: “byte 1 is for red, byte 2 is for blue, byte 3 is green”.
In this example we’ll use the Seeed XAIO BLE module . The code will work with both sense and non-sense variants as we’ll just be controlling the user LED with our protocol.
Your protocol will be defined in a .proto file. For example, say we want to control an RGB LED’s color then our .proto file might look something like this:
syntax = "proto3";

message LEDColor {
    int32 red = 1;
    int32 green = 2;
    int32 blue = 3;
}
I recommend looking through the protocol buffer documentation to see the different types. Obviously, a 32bit integer is overkill for a color value, but this is the lowest type available.
Notice the incrementing numbers on the right. They do not have to be ordered but they will have to be unique within the message (in this case LEDColor).
With our schema in mind, let’s set up our Zephyr project. After creating your new project, navigate to the CMakeLists.txt file and add the following:
# SPDX-License-Identifier: Apache-2.0

cmake_minimum_required(VERSION 3.20.0)

find_package(Zephyr REQUIRED HINTS $ENV{ZEPHYR_BASE})
project(protobuf-ble-sample)

list(APPEND CMAKE_MODULE_PATH ${ZEPHYR_BASE}/modules/nanopb)
include(nanopb)

zephyr_nanopb_sources(app src/proto/led_color.proto)

FILE(GLOB app_sources src/*.c src/services/*.c src/lib/*.c)
target_sources(app PRIVATE ${app_sources})
Some things to point out:
list(APPEND CMAKE_MODULE_PATH ${ZEPHYR_BASE}/modules/nanopb)
include(nanopb)
These lines include the nanopb module, as it does not come out of the box with Zephyr.
zephyr_nanopb_sources(app src/proto/led_color.proto)This tells the nanopb module where our protofile will be stored.
Open the prj.conf file and include the following:
CONFIG_NANOPB=y

# Bluetooth configuration
CONFIG_BT=y
CONFIG_BT_PERIPHERAL=y
CONFIG_BT_DEVICE_NAME="My LED Device"
Create a src/proto/led_color.proto file and add our schema:
syntax = "proto3";

message LEDColorMessage {
    int32 red = 1;
    int32 green = 2;
    int32 blue = 3;
}
First, we should define a struct type that will be used to control our LED. Create a src/lib/user_types.h file with the following:
#ifndef USER_TYPES_H
#define USER_TYPES_H

typedef struct
{
    int red;
    int green;
    int blue;
} led_color_t;

#endif // USER_TYPES_H
Let’s build out our proto library. Create a src/lib/proto_helper.h file and add the following:
#ifndef PROTO_HELPER_H
#define PROTO_HELPER_H

#include <pb_encode.h>
#include <pb_decode.h>
#include "src/proto/led_color.pb.h"
#include "user_types.h"

bool encode_message(uint8_t *buffer, size_t buffer_size, size_t *message_length, led_color_t *led_color);
led_color_t decode_message(uint8_t *buffer, size_t message_length);

#endif // PROTO_HELPER_H
Let’s define the encode_message and decode_message in src/lib/proto_helper.c:
#include "proto_helper.h"

static led_color_t led_color = {
    .red = 0,
    .green = 0,
    .blue = 0,
};

bool encode_message(uint8_t *buffer, size_t buffer_size, size_t *message_length, led_color_t *led_color)
{
    LEDColorMessage message = LEDColorMessage_init_zero;
    pb_ostream_t stream = pb_ostream_from_buffer(buffer, buffer_size);

    message.red = led_color->red;
    message.green = led_color->green;
    message.blue = led_color->blue;

    bool status = pb_encode(&stream, LEDColorMessage_fields, &message);
    *message_length = stream.bytes_written;

    if (!status)
    {
        printk("Encoding failed: %s\n", PB_GET_ERROR(&stream));
    }

    return status;
}

led_color_t decode_message(uint8_t *buffer, size_t message_length)
{
    LEDColorMessage message = LEDColorMessage_init_zero;
    pb_istream_t stream = pb_istream_from_buffer(buffer, message_length);
    bool status = pb_decode(&stream, LEDColorMessage_fields, &message);

    if (status)
    {
        printk("New LED set to: %d %d %d\n", (int)message.red, (int)message.green, (int)message.blue);
        led_color.red = (int)message.red;
        led_color.green = (int)message.green;
        led_color.blue = (int)message.blue;
    }
    else
    {
        printk("Decoding failed: %s\n", PB_GET_ERROR(&stream));
    }

    return led_color;
}
Notice the calls to a couple of functions prefixed with pb_ such as pb_istream_from_buffer and pb_decode.
With how we configured our CMakeLists.txt file we told the build process to generate a special library for us specifically using the .proto file we defined.
You can see this in build/src/proto after the project is built for the first time.
With our proto encoder and decoder set up, let’s move onto Bluetooth. Create a src/lib/bluetooth.h file and add the following:
#ifndef BLUETOOTH_H
#define BLUETOOTH_H

#include <zephyr/bluetooth/bluetooth.h>
#include <zephyr/bluetooth/hci.h>
#include <zephyr/bluetooth/conn.h>
#include <zephyr/bluetooth/uuid.h>
#include <zephyr/bluetooth/gatt.h>

void ble_init();

#endif // BLUETOOTH_H
In src/lib/bluetooth.c add the following:
#include "bluetooth.h"

struct bt_conn *connection;
static K_SEM_DEFINE(ble_init_ok, 0, 1);

static void connected(struct bt_conn *conn, uint8_t err)
{
    struct bt_conn_info info;
    char addr[BT_ADDR_LE_STR_LEN];

    connection = conn;

    if (err)
    {
        printk("Connection failed (err %u)\n", err);
        return;
    }
    else if (bt_conn_get_info(conn, &info))
    {
        printk("Could not parse connection info\n");
    }
    else
    {
        bt_addr_le_to_str(bt_conn_get_dst(conn), addr, sizeof(addr));
        printk("Connection established!		\n\
		Connected to: %s					\n\
		Role: %u							\n\
		Connection interval: %u				\n\
		Slave latency: %u					\n\
		Connection supervisory timeout: %u	\n",
               addr, info.role, info.le.interval, info.le.latency, info.le.timeout);
    }
}

static void disconnected(struct bt_conn *conn, uint8_t reason)
{
    printk("Disconnected: %d\n", reason);
    connection = NULL;
}

static struct bt_conn_cb conn_callbacks = {
    .connected = connected,
    .disconnected = disconnected,
    .le_param_req = NULL,
    .le_param_updated = NULL};

static void bt_ready(int err)
{
    if (err)
    {
        printk("BLE init failed with error code %d\n", err);
        return;
    }

    bt_conn_cb_register(&conn_callbacks);

    if (err)
    {
        printk("Failed to init services (err:%d)\n", err);
        return;
    }

    struct bt_data ad[] = {
        BT_DATA_BYTES(BT_DATA_FLAGS, (BT_LE_AD_GENERAL | BT_LE_AD_NO_BREDR)),
        BT_DATA(BT_DATA_NAME_COMPLETE, CONFIG_BT_DEVICE_NAME, sizeof(CONFIG_BT_DEVICE_NAME)),
    };

    struct bt_data sd[] = {
        BT_DATA(BT_DATA_NAME_COMPLETE, CONFIG_BT_DEVICE_NAME, sizeof(CONFIG_BT_DEVICE_NAME)),
    };

    err = bt_le_adv_start(BT_LE_ADV_CONN, ad, ARRAY_SIZE(ad),
                          sd, ARRAY_SIZE(sd));

    if (err)
    {
        printk("Advertising failed to start (err %d)\n", err);
        return;
    }
    k_sem_give(&ble_init_ok);
}

void ble_init()
{
    int err = 0;

    err = bt_enable(bt_ready);
    if (err)
    {
        printk("BLE initialization failed\n");
    }

    err = k_sem_take(&ble_init_ok, K_MSEC(500));

    if (err)
    {
        printk("BLE initialization did not complete in time\n");
    }
}
Next, we need to define a service and characteristic. Create a new file src/services/led_service.h and add the following:
#ifndef LED_SERVICE_H
#define LED_SERVICE_H

#include <zephyr/types.h>
#include <stddef.h>
#include <string.h>
#include <errno.h>
#include <zephyr/kernel.h>
#include <soc.h>

#include <zephyr/bluetooth/bluetooth.h>
#include <zephyr/bluetooth/gatt.h>
#include <zephyr/bluetooth/conn.h>
#include <zephyr/bluetooth/uuid.h>
#include <zephyr/bluetooth/hci.h>

#include "../lib/user_types.h"

#define LED_SERVICE_UUID BT_UUID_128_ENCODE(0xEC0C6AB1, 0x66C9, 0x4A2C, 0x917A, 0x8B5879D9FCAA)

#define LED_CHARACTERISTIC_UUID BT_UUID_128_ENCODE(0xEC0C6AB1, 0x66C9, 0x4A2C, 0x917A, 0x8B5879D9FCAB)

typedef void (*write_callback_t)(uint8_t *data, uint16_t len);
typedef uint8_t *(*read_callback_t)();

void led_service_init(write_callback_t write_cb, read_callback_t read_cb);

#endif // LED_SERVICE_H
Feel free to change LED_SERVICE_UUID and LED_CHARACTERISTIC_UUID to suit your project.
In src/services/led_service.c add the following:
#include "led_service.h"

#define BT_UUID_LED_SERVICE BT_UUID_DECLARE_128(LED_SERVICE_UUID)
#define BT_UUID_LED_CHARACTERISTIC BT_UUID_DECLARE_128(LED_CHARACTERISTIC_UUID)

static write_callback_t write_callback;
static read_callback_t read_callback;

void led_service_init(write_callback_t write_cb, read_callback_t read_cb)
{
    write_callback = write_cb;
    read_callback = read_cb;
}

static ssize_t on_write(struct bt_conn *conn,
                        const struct bt_gatt_attr *attr,
                        const void *buf,
                        uint16_t len,
                        uint16_t offset,
                        uint8_t flags)
{
    if (write_callback != NULL)
    {
        write_callback(buf, len);
    }
}

static ssize_t on_read(struct bt_conn *conn,
                       const struct bt_gatt_attr *attr,
                       void *buf,
                       uint16_t len,
                       uint16_t offset)
{
    uint8_t *encoded_buffer = read_callback();
    return bt_gatt_attr_read(conn, attr, buf, len, offset,
                             encoded_buffer, sizeof(encoded_buffer));
}

BT_GATT_SERVICE_DEFINE(led_service,
                       BT_GATT_PRIMARY_SERVICE(BT_UUID_LED_SERVICE),
                       BT_GATT_CHARACTERISTIC(BT_UUID_LED_CHARACTERISTIC,
                                              BT_GATT_CHRC_WRITE | BT_GATT_CHRC_READ,
                                              BT_GATT_PERM_WRITE | BT_GATT_PERM_READ,
                                              on_read, on_write, NULL), );
Here we define our new service and assign some callbacks for read and write operations.
Finally, in src/main.c add the application code:
#include <zephyr/kernel.h>
#include <zephyr/sys/printk.h>
#include <zephyr/drivers/gpio.h>

#include "services/led_service.h"
#include "lib/bluetooth.h"
#include "lib/proto_helper.h"

#define RED_LED_NODE DT_ALIAS(led0)
#define GREEN_LED_NODE DT_ALIAS(led1)
#define BLUE_LED_NODE DT_ALIAS(led2)

static const struct gpio_dt_spec red_led = GPIO_DT_SPEC_GET(RED_LED_NODE, gpios);
static const struct gpio_dt_spec green_led = GPIO_DT_SPEC_GET(GREEN_LED_NODE, gpios);
static const struct gpio_dt_spec blue_led = GPIO_DT_SPEC_GET(BLUE_LED_NODE, gpios);

static led_color_t led_color = {
	.red = 0,
	.green = 1,
	.blue = 0,
};

static uint8_t encoded_buffer[LEDColorMessage_size];
static size_t message_length;

static int leds_init(void)
{
	if (!device_is_ready(red_led.port) ||
		!device_is_ready(green_led.port) ||
		!device_is_ready(blue_led.port))
	{
		printk("One or more LEDs are not ready\n");
		return -ENODEV;
	}
	return 0;
}

static void update_leds()
{
	int red_state = led_color.red == 1 ? GPIO_OUTPUT_ACTIVE : GPIO_OUTPUT_INACTIVE;
	int green_state = led_color.green == 1 ? GPIO_OUTPUT_ACTIVE : GPIO_OUTPUT_INACTIVE;
	int blue_state = led_color.blue == 1 ? GPIO_OUTPUT_ACTIVE : GPIO_OUTPUT_INACTIVE;

	gpio_pin_configure_dt(&red_led, red_state);
	gpio_pin_configure_dt(&green_led, green_state);
	gpio_pin_configure_dt(&blue_led, blue_state);
}

void write_callback(uint8_t *data, uint16_t len)
{
	led_color = decode_message(data, len);
	update_leds();
}

uint8_t *read_callback()
{
	encode_message(encoded_buffer, sizeof(encoded_buffer), &message_length, &led_color);

	printk("Encoded message length: %d\n", LEDColorMessage_size);
	for (int i = 0; i < LEDColorMessage_size; i++)
	{
		printk("%d ", encoded_buffer[i]);
	}
	printk("\n");
	return encoded_buffer;
}

int main(void)
{
	ble_init();
	led_service_init(write_callback, read_callback);
	leds_init();
	update_leds();

	while (1)
	{
		k_sleep(K_FOREVER);
	}
}
The main logic does not do much other than wait for a read or a write operation from the Bluetooth library.
Once a read operation gets triggered, we use the encode_message function from the proto_helper library to encode the global led_color state.
This will return a pointer to a byte array that will get sent via the led_service library.
When a write operation occurs, we use the decode_message function to translate the incoming byte array into an led_color_t and assign it to the global led_color variable. We then update the onboard LED based on the decoded data.
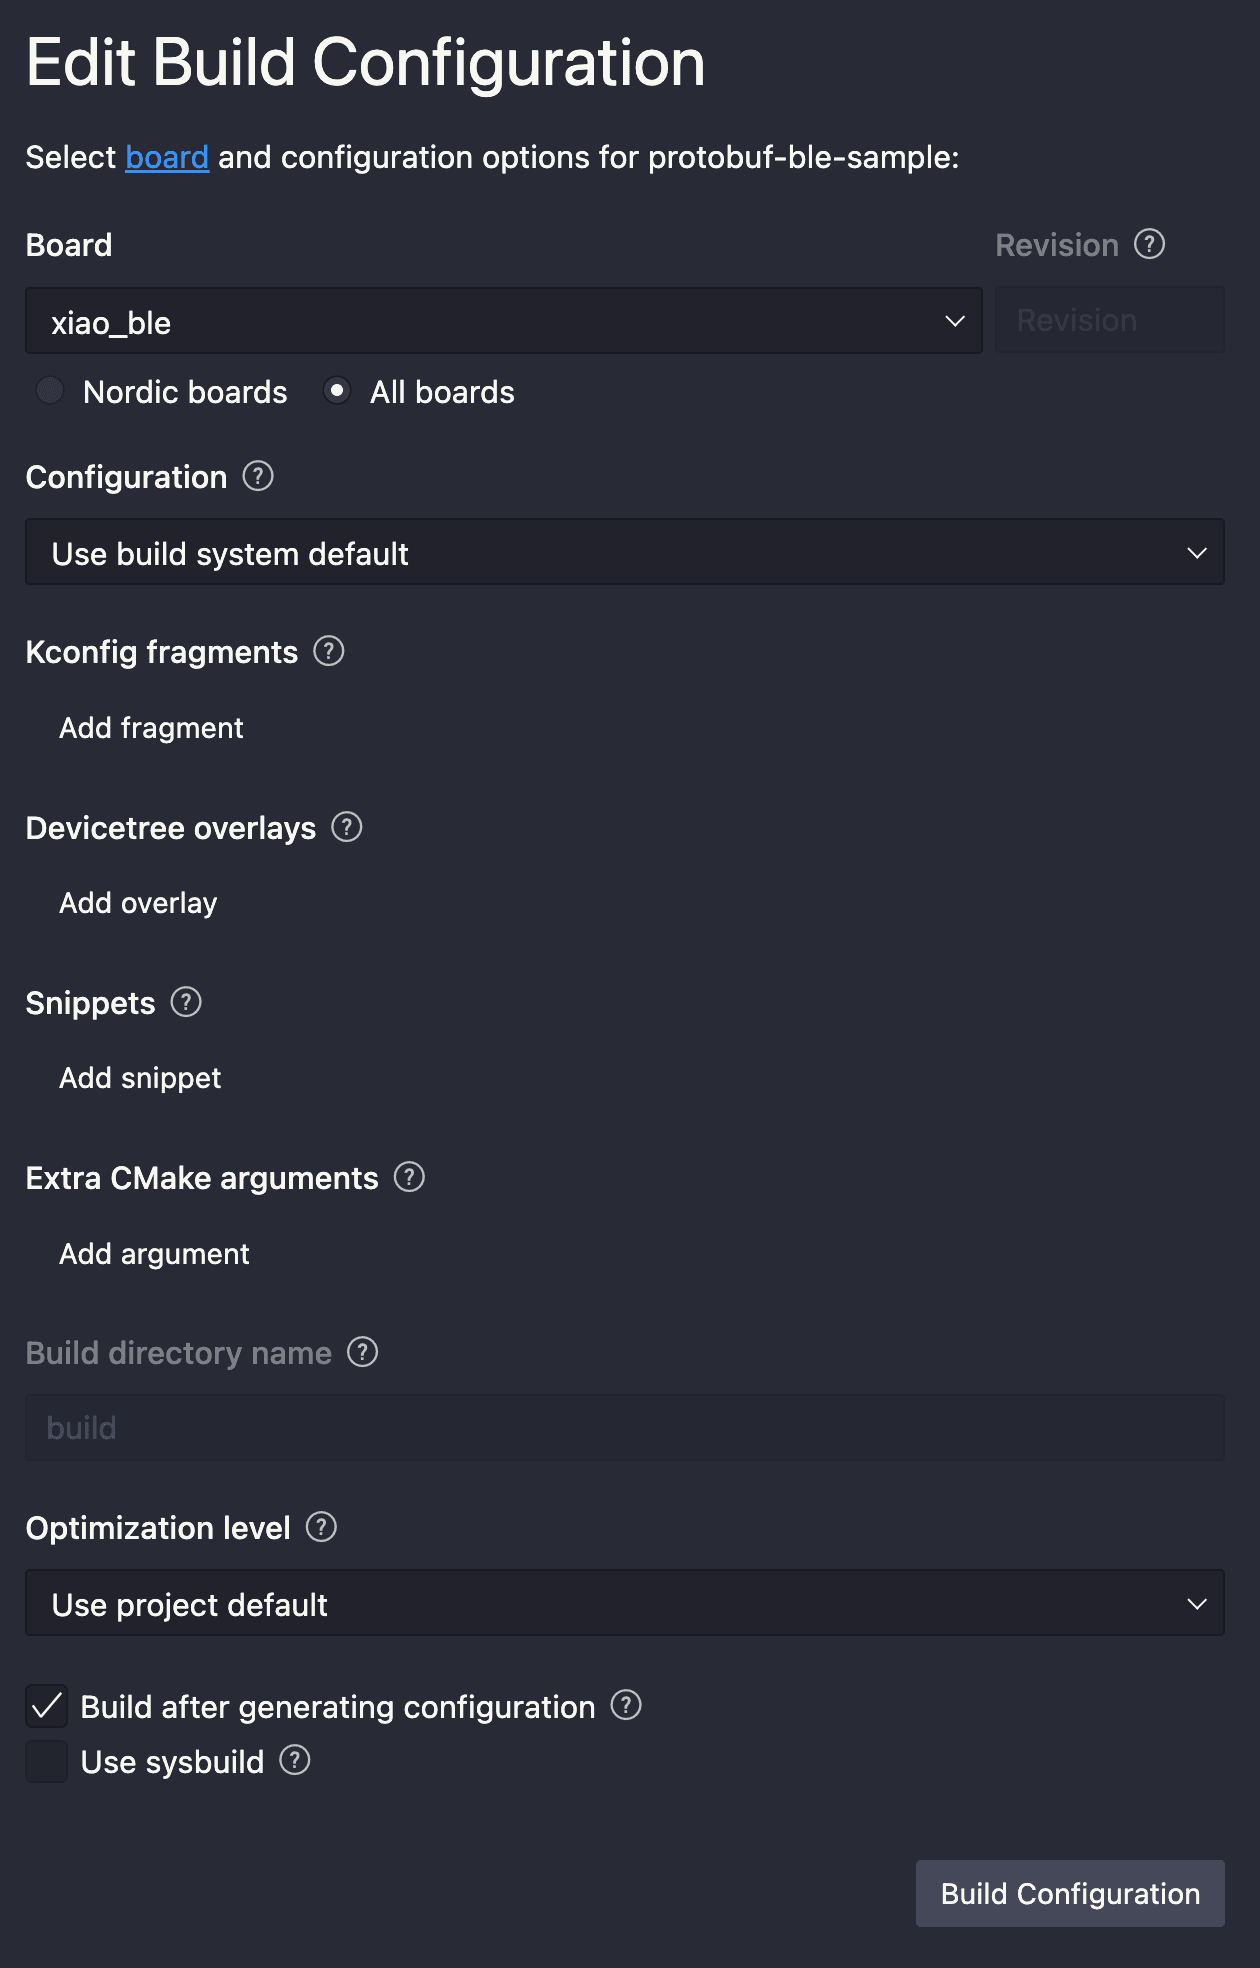
Next we can build the project for the XIAO BLE board. Here is an example build configuration:
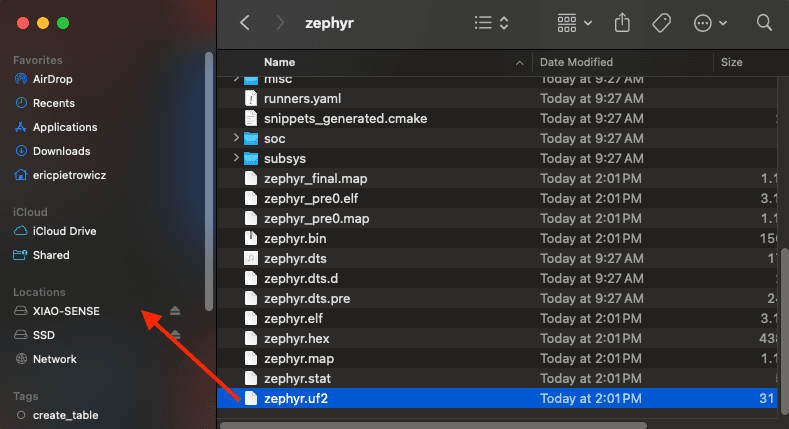
Once built, double click the reset button on the device to enter bootloader mode. Then drag the generated build/zephyr/zephyr.uf2 file into the removable disk labeled XIAO-SENSE.
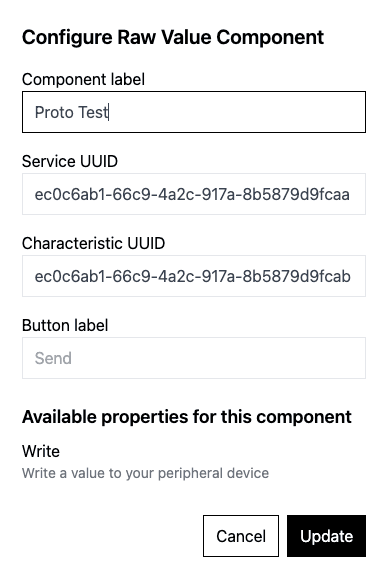
Let’s test that it’s working! Go to Blueprint and add a Raw Value component. Configure it with your service and characteristic UUID that you defined earlier.
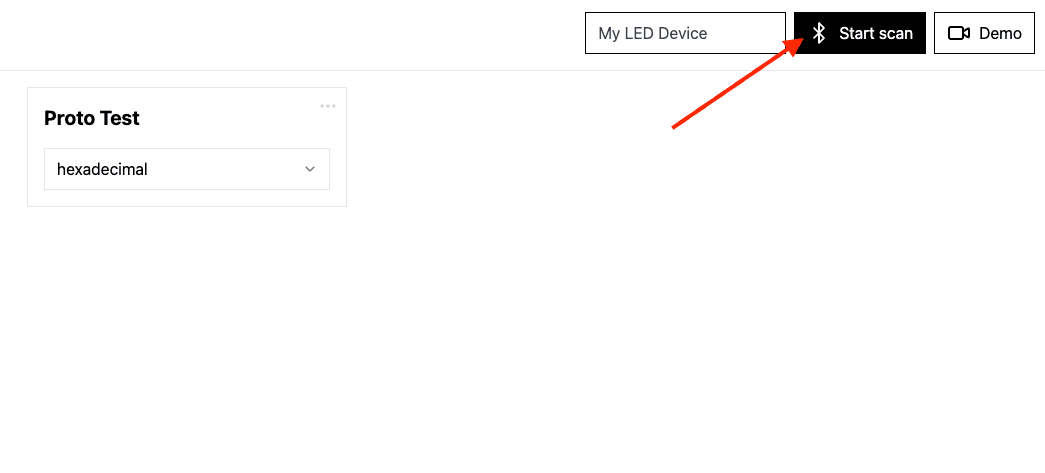
Connect to your device.
Now we need to encode some data to send. Navigate to Protobufpal and perform the following steps:
- Copy your .proto file into the Protobuf Definition section
- Select your Protobuf Definition in the dropdown
- Build a JSON object with your intended message in the Decoded Message section
- Make sure to choose hex in the Encoded Message section
- Finally, click Encode
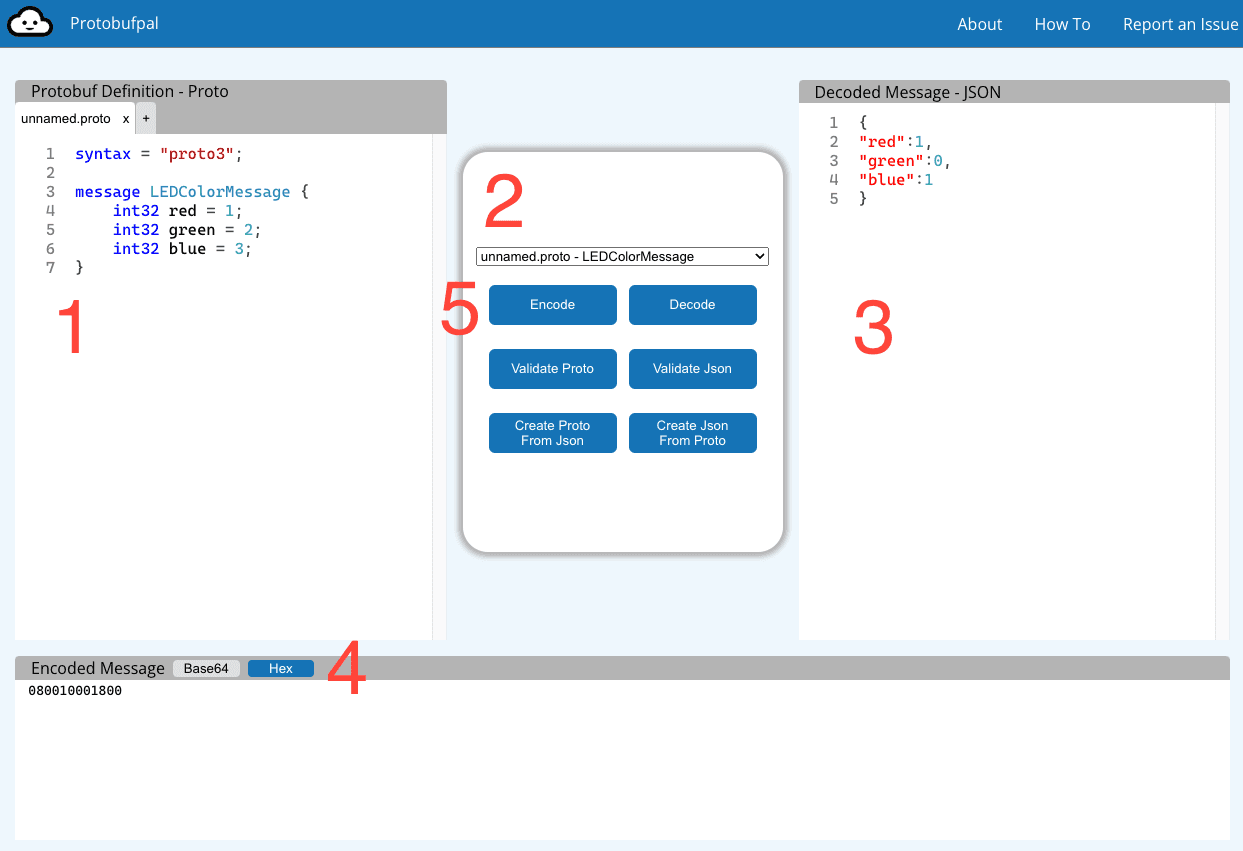
Copy this value and paste it into your Raw Value component in Blueprint making sure hexadecimal is selected.
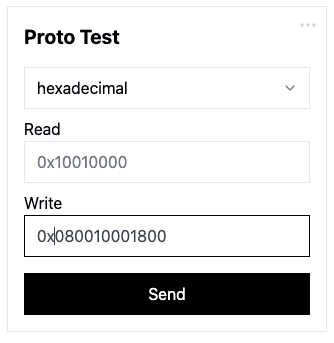
After clicking Send, you should see your LED change color! Remember the XIAO only has discrete LEDs so you can only send a 1 or a 0 for each color.
If you sent:
{
  "red": 1,
  "green": 0,
  "blue": 1
}
Your LED should now be purple! And of course you can do the opposite, checking the state of the LED by reading the value
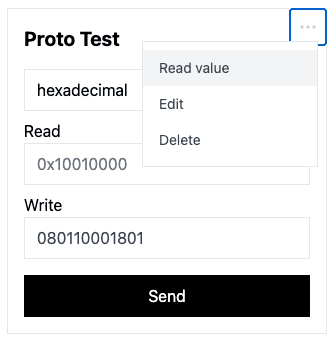
And the pasting the result into the Encoded Message section of Protobufpal , clicking Decode and viewing the Decoded Message result.
This is a very simple example, but you can see how powerful Protobufs can be when developing larger Bluetooth applications.
The git repository for this project is hosted here .